

How To Clear Recent Files In Windows 10
How to Add or Remove Recent files from Quick access in Windows 10Windows x replaced Favorites from previous Windows with Quick access. The Quick admission page is the shortest route to files you've been working on and folders you often apply. These are your frequent folders and recent files.
In Windows 10, File Explorer opens to Quick access by default which shows your Frequent folders and Contempo files.
- Frequent folders = Displays up to ten folders that you oft opened on the system.
- Recent files = Displays up to twenty files that yous most recently opened.
This tutorial will show y'all how to add or remove Recent files in Quick access in File Explorer for all users or but your account in Windows ten.When you hide or remove Recent files in Quick admission, it will also clear its history.
Contents
- Option One: Hide or Testify "Recent Files" in Quick Access for Your Business relationship using File Explorer Options
- Option Two: Hide or Show "Contempo Files" in Quick Access for Your Business relationship using a REG file
- Pick Three: Add together or Remove "Recent Files" in Quick Admission for All Users using a REG file
EXAMPLE: Quick admission in Windows 10

OPTION 1
Hide or Prove "Recent Files" in Quick Access for Your Account using File Explorer Options
1 Open File Explorer Options.
two Exercise stride 3 or footstep 4 beneath for what you lot would like to do.
3. To Show "Contempo files" in Quick access
This is the default settin.
4. To Hibernate "Recent files" in Quick admission
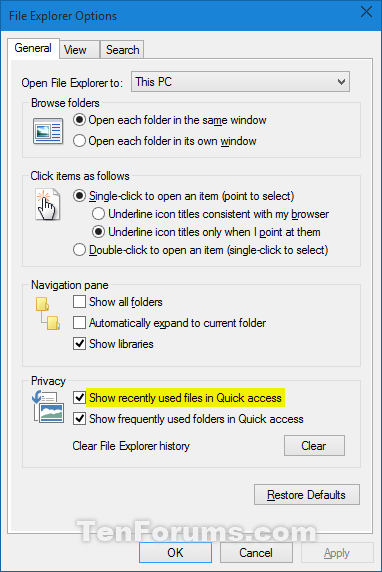
A) In the General tab under Privacy, uncheck the Show recently used files in Quick access box, and click/tap on OK. (see screenshot below)
Selection Two
Hibernate or Testify "Recent Files" in Quick Access for Your Business relationship using a REG file
1 Practice step 2 or step three below for what you lot would like to do.
2. To Show "Recent files" in Quick admission
This is the default setting.
three. To Hide "Recent files" in Quick access
A) Click/tap on the Download button below to download the file beneath, and become to step four below.
Hide_Recent_files_in_Quick_access.reg Download
4 Save the .reg file to your desktop.
5 Double click/tap on the downloaded .reg file to merge it.
six When prompted, click/tap on Run, Yes (UAC), Yes, and OK to approve the merge.
7 If the Quick access is currently open, then refresh (F5) it or close and open up it to use.
8 You can now delete the downloaded .reg file if you like.
Pick THREE
Add or Remove "Recent Files" in Quick Access for All Users using a REG file
You must be signed in every bit an administrator to be able to do this pick.
Removing contempo files using this choice will override what users accept set in Option One and Pick 1 above.
i Do stride 2, step iii, or footstep 4 below for what you would like to do.
2. To Add "Recent files" to Quick access in 32-bit Windows 10
This is the default setting.
A) Click/tap on the Download push below to download the file below, and go to footstep 5 below.
32-bit_Add_Recent_Files_to_Quick_access.reg
Download
3. To Add together "Recent files" to Quick admission in 64-flake Windows x
This is the default setting.
A) Click/tap on the Download button below to download the file below, and go to pace 5 below.
64-bit_Add_Recent_Files_to_Quick_access.reg
Download
iv. To Remove "Contempo files" from Quick access
A) Click/tap on the Download button below to download the file below, and go to step v below.
Remove_Recent_Files_from_Quick_access.reg
Download
5 Save the .reg file to your desktop.
6 Double click/tap on the downloaded .reg file to merge information technology.
7 When prompted, click/tap on Run, Yes (UAC), Yes, and OK to approve the merge.
8 If the Quick access is currently open up, then refresh (F5) it or close and open information technology to apply.
9 You tin now delete the downloaded .reg file if yous like.
That'south it,
Shawn
Windows 11 Tutorials

How To Clear Recent Files In Windows 10,
Source: https://www.tenforums.com/tutorials/2713-add-remove-recent-files-quick-access-windows-10-a.html
Posted by: chavisiont1981.blogspot.com
0 Response to "How To Clear Recent Files In Windows 10"
Post a Comment